UFO Bowling
Numbers 3, 6.7, 10 & 8 have been drawn in previous months and we drew number 2 at our meeting on June 28th. Your goal is to work on project number 2 from your list this month andcomplete it by the July meeting.
As a reminder, please give me your list. - Questions? see Fran Gambino
As a reminder, please give me your list. - Questions? see Fran Gambino
Fat Quarter Exchange
For the month of July: Yellows (solids or prints)
(Note: Please remember Fat Quarters are 18” X 22”)
Bring Fat Quarters in the color/theme of the month. For each Fat Quarter you submit, you are given one chance of winning a group of Fat Quarters that have been submitted for that month. The more Fat Quarters you submit, the more chances you have of winning a group of Fat Quarters. … In case you had not noticed, the Fat Quarter color of the month will be a featured fabric color for the Block on the Month the following month. If you win, you will be ready to make lots of blocks for the next month.
Block of the Month
Want a chance to win a stack of fun blocks to sew into your own creation? Or how about the opportunity to make a block you’ve never tried before? Then join our Block of the Month event!
Each month at our general day-time guild meeting, a new block pattern will be shared. These blocks are easy to make, and follow a fun theme. The patterns are free, and instructions are easy to follow. For each block you turn in the following month, you get a chance to win a stack of that month’s blocks. Try it!
Current (and past month’s) blocks are listed below:
Block of the Month: Prairie Queen

Colors: A. White (solid or white on white)
B. Your Favorite Color (prints and/or solids) Cutting for (1) 12 ½” square unfinished block: A. White: (2) 5” squares (1) 2 ½” X 21” Strip B. Favorite Color (2) 5” squares (1) 2 ½” X 21” Strip (1) 4 ½” square Note: If you would like to use 2 Favorite Colors (Medium and Dark) make the Squares from the Dark fabric and the Strip from the Medium. Half Square Triangles (HST) Make 4 1. Draw diagonal line on back of all (2) 5” Sq. White squares. 2. Place a White 5” Sq. RST (Right Sides Together) with a Favorite Color 5” Sq. Sew ¼” on both sides of the line. 3. Repeat Line #2 for Second Square. 4. Cut all (2) 5” Sq. on diagonal line to make (4) HST. Press toward the darker fabric. Square up the (4) HST to 4 ½” Sq. Four-Patch Side Units. Make 4 1. With Right Sides Together (RST) sew the White Strip to the Favorite Color Strip along the long edge. 2. Press flat first to set the seam and then open and press to the darker color fabric. 3. Straighten one short edge of the stripset by aligning a line on your ruler with the seamline and cut off no more than ¼”. 4. Subcut into (8) 2 ½” X 4 ½” units. 5. With RST sew a pair together to make (4) Four-Patch Side Units as shown. Square up the (4) Four-Path units to 4 ½” Sq. Layout and Assemble your Prairie Queen quilt block as shown: 
|
| newspatcher_prairie_queen.pdf |
Block of the Month: Land I Love

Colors: Red, White and Blue
Cutting for (1) 12 ½” X 12 ½” unfinished block.
(A) Red
(2) 2” X 3 ½” (2) 2 ½” X 8” (1) 2 ½” X 12 ½”
(B) White
(1) 2 ½” X 8” (2) 2 ½” X 12 ½” (4) 1 ¼” Sq. (8) 2” Sq.
(C) Blue
(3) 2” X 3 ½” (2) 2” Sq.
RST = Right Sides Together
Heart
1. Draw a diagonal line on the wrong side from corner to corner on (4) white 1 ¼” Sq.
2. Place RST (1) White 1 ¼” Sq. in upper Right corner of (2) Red 2” X 3 ½” rectangles. Sew on diagonal line. Trim
leaving ¼” on the outside of the line/seam. Press toward the lighter fabric.
3. Place RST (1) White 1 ¼” Sq. in upper Left corner of (2) Red 2” X 3 ½” rectangles. Sew on diagonal line. Trim
leaving ¼” on the outside of the line/seam. Press toward the darker fabric.
4. Draw a diagonal line on wrong side from corner to corner on (8) White 2” Sq.
5. Place a 2” White sq. RST to bottom Right of (1) Red 2” X 3 ½” rectangle. Stitch on diagonal line. Trim leaving ¼”
on the outside of the line/seam. Press toward the darker fabric.
6. Place a 2” White sq. RST to bottom Left of (1) Red 2” X 3 ½” rectangle. Stitch on diagonal line. Trim leaving ¼”
on the outside of the line/seam. Press toward the lighter fabric.
7. Sew the 2 units together to form a Heart.
Star
8. With RST layer (1) White 2” Sq. in the upper Left corner of Blue 2” X 3 ½” rectangle. Sew on drawn line. Trim
leaving ¼” on the outside of the line/seam. Press toward the lighter fabric.
9. With RST layer (1) White 2” Sq. in the upper Right corner of Blue 2” X 3 ½” rectangle. Sew on drawn line. Trim
leaving ¼” on the outside of the line/seam. Press toward the darker fabric.
10. Repeat #8 and #9 to complete 2 more Flying Geese for a total of 3.
11. Sew a Blue 2” Sq. to each end of one of the Flying Geese units. Press toward the darker fabric.
12. Assemble Heart/Star Block as shown below in Fig. 1. Trim to 5”w X 6 ½” h. Set aside
Flag
13. Sew RST (1) Red 2 ½” X 8” to top of (1) White 2 ½” X 8”. Add (1) Red 2 ½” X 8” to bottom of White Strip. Press
toward darker fabric.
14. Sew RST (1) White 2 ½” X 12 ½” to top of (1) Red 2 ½” X 12 ½”. Add (1) White 2 ½” X 12 ½” to bottom of Red
Strip. Press toward darker fabric.
Assemble remainder of block as shown in Fig. 2.
Fig: 1. Fig: 2.


| newspatcher_land_i_love.pdf |
Block of the Month: Birdie Birdie

Colors: (A) Background – Sky Blue, Light Grey
(B) Birdie (Bird Chest and Back Wing) Color #1 – Lighter Coordinate with Birdie Color #2
(C) Birdie (Bird Body and Tail) Color #2 – Darker Coordinate with Birdie Color #1
(D) Beak - Orange
Cutting for (1) 12 ½” X 12 ½” unfinished bloc
(A) Background
(2) 2 ½” X 12 ½ “ (3) 2 ½” X 6 ½” (2) 1 ½” X 2 ½” (4) 3” Sq.
(1) 2 ½” Sq. (1) 1” Sq.
(B) Birdie Color # 1
(1) 3” Sq. (1) 2 ½” Sq. (1) 1 ½” Sq.
(C) Birdie Color #2
(3) 3” Sq. (5) 2 ½” Sq. (1) 1 ½” Sq.
(D) Beak (2) 1” Sq.
- Draw diagonal line on back of all (4) 3” Sq. Background squares.
- Place a 3” Sq. background RST (Right Sides Together) with a Color #1 (1) 3” Sq. Sew ¼” on both sides of the line.
- Place a 3” Sq. background RST with a Color #2 (3) 3” Sq. Sew ¼” on both sides of the line.
- Cut all (4) 3” Sq. on diagonal line to make 8 HST (Half Square Triangles). Press toward the darker fabric. Square up the 8 HST to 2 ½” Sq.
- Draw diagonal line on back of (2) 1” Sq. Beaks (1) 1” Sq. Background (1) 1 ½” Sq. Color #1 (1) 1 ½” Sq. Color #2
- Place a Beak (1) 1” Sq. RST with (1) 1 ½” X 2 ½” Background square in upper Right corner. Sew on line. Trim leaving ¼” outside of the line/seam and then press toward the lighter fabric.
- Place a Beak (1) 1” Sq. RST with (1) 1 ½” X 2 ½” Background square in upper Left corner. Sew on line. Trim leaving ¼” outside of the line/seam and then press toward the darker fabric. Join the 2 Beak pieces as shown below.
- Place a Color #2 (1) 2 ½” Sq. RST with (1) 1” Sq. Background square in upper Right corner. Sew on line. Trim leaving ¼” outside of the line/seam and then press toward the darker fabric.
- Place a Color #2 (1) 2 ½” Sq. RST with Color #1 (1) 1 ½” Sq.in lower Right corner. Sew on line. Trim leaving ¼” outside of the line/seam and then press toward the darker fabric.
- Place a Color #1 (1) 2 ½” Sq. RST with Color #2 (1) 1 ½” Sq.in upper Left corner. Sew on line. Trim leaving ¼” outside of the line/seam and then press toward the darker fabric.
- Assemble as Shown: Light Blue = Background Red = Color #1 Dark Blue = Color #2
| |||

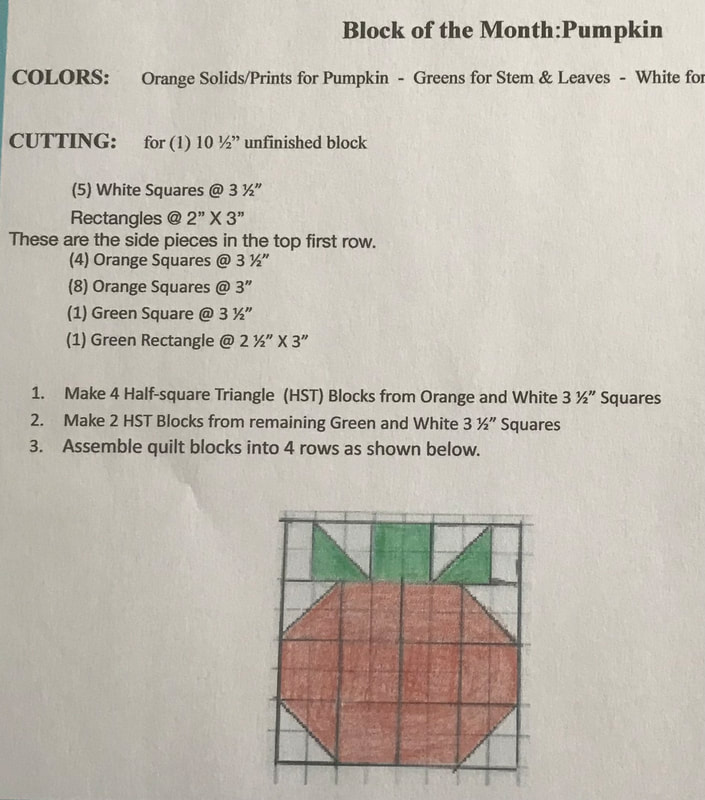
Block of the Month April: Posey
Colors: (A) Background – Black
(B) Posey – Scrappy Posey colors (Brights, Pastels, etc., Posey’s come in almost every color)
(C) Center – Should have high contrast with the petals (ie: yellows, oranges, reds, etc.)
Cutting for (1) 10 ½” X 10 ½” unfinished block
(A) Background
(8) 3” Black Squares
(B) Petals
(4) 5 ½” Squares
(C) Center
(4) 1 ¾” Squares
Mark a diagonal line across the back of all the 3” Black squares and across the back of the Center squares. First corner: Place a background square RST (Right Sides Together) with a Flower fabric in the top left corner. Sew on the line. Trim leaving 1/4” on the outside of the line/seam. Press the seam toward the darker fabric.
Second corner: Add the remaining background squares to a corner adjacent to the first in the same fashion. Trim leaving ¼” on the outside of the line/seam. Press the seam toward the darker fabric.
Add Centers: With the points of the background squares pointing up like little houses add the center squares to the lower right corner. Sew on the line, trim leaving ¼” outsideof the line/seam and then press. Layout the completed petal units as a 4-patch with the Center fabrics meeting in the center, alternating them based on the direction you pressed the last seam. Sew the (4) HSTs (Half Square Triangles) together.
Block of the Month March: Butterfly |
|
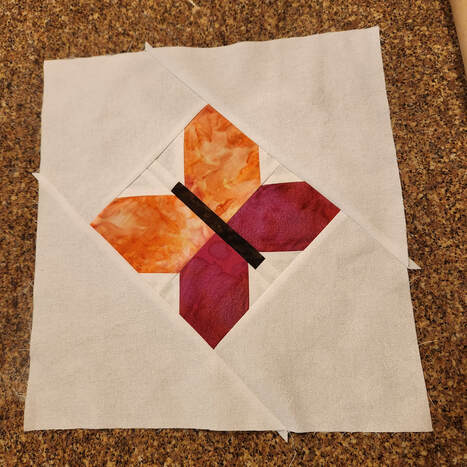
Colors: (A) Background - White
(B) Butterfly – Bright Colors
(C) Body - Brown
Cutting for (1) 12 ½” X 12 ½” unfinished block
(A) White Background
(2) 8.75” Squares
(2) 2” Squares (upper inside top wings)
(6) 1.5” Squares (upper outside top wings)
(upper outside bottom wings)
(lower inside bottom wings)
(1) 1” X 1.75” (body Top)
(1) 1” X 1.25” (body Bottom)
(B) Butterfly Wings
Top wings
(2) 3.25” X 4”
Bottom wings
(2) 3.25” X 3”
(C) Body
(1) 1” X 4.5”
Mark all white squares with a diagonal stitching line. Layout your pieces as shown.
Stich on the marked line on all squares then clips ¼” away from the stitched line. Then flip and press.
Stich the top wings to the bottom wings and press.
Sew together the last three body pieces and attach to the wings.
Cut both the 8.75” squares in half diagonally.
Fold each triangle in half and make a crease in the center. Place the center triangle mark with the top center of the butterfly block (RST) and stitch.
Trim corners of triangles even with Butterfly block.
Fold the Butterfly in half to find the center of the sides. Match triangle center with the center of the sides with RST and stitch.
Press block.
For Layout Diagram click link:
| butterflymarchlayout.pdf |
Block of the Month February: Scrappy Clover
Colors:
(A) Background - White
(B) Clover – Scrappy Greens
Cutting for (1) 12 ½” X 12 ½” unfinished block
(A) Background
(10) 3” White Squares
(12) 1 ½” White Squares
(B) Clover
(10) 3” Green Squares
(16) 2 ½” Green Squares
Fat Quarter Exchange:
Bring Fat Quarters in the color/theme of the month. For each Fat Quarter you submit, you are given one chance of winning a group of Fat Quarters that have been submitted for that month. The more Fat Quarters you submit, the more chances you have of winning a group of Fat Quarters. … In case you had not noticed, the Fat Quarter color of the month will be a featured fabric color for the Block on the Month the following month. If you win, you will be ready to make lots of blocks for the next month.
Fat Quarter Exchange:
For the month of April: Yellows, Reds, Blues
(Note: Please remember Fat Quarters are 18” X 22”)
Bring Fat Quarters in the color/theme of the month. For each Fat Quarter you submit, you are given one chance of winning a group of Fat Quarters that have been submitted for that month. The more Fat Quarters you submit, the more chances you have of winning a group of Fat Quarters. … In case you had not noticed, the Fat Quarter color of the month will be a featured fabric color for the Block on the Month the following month. If you win, you will be ready to make lots of blocks for the next month.
Fat Quarter Exchange:
For the month of February: Brights (Solids, Prints, Any Fabric that is Bright Colors)
Bring Fat Quarters in the color/theme of the month. For each Fat Quarter you submit, you are given one chance of winning a group of Fat Quarters that have been submitted for that month. The more Fat Quarters you submit, the more chances you have of winning a group of Fat Quarters. … In case you had not noticed, the Fat Quarter color of the month will be a featured fabric color for the Block on the Month the following month. If you win, you will be ready to make lots of blocks for the next month.
Colors:
(A) Background - White
(B) Clover – Scrappy Greens
Cutting for (1) 12 ½” X 12 ½” unfinished block
(A) Background
(10) 3” White Squares
(12) 1 ½” White Squares
(B) Clover
(10) 3” Green Squares
(16) 2 ½” Green Squares
- Mark a diagonal line across the back of a 3” White square. Place the background square RST with a 3” Green square. Sew ¼” away from each side of the marked line. Cut the unit apart on the drawn line and press open. Repeat for a total of 20 HST. Trim each HST to 2 ½” X 2 ½”.
- Sew together (4) 2 ½” Green squares to create a 4 patch. The 4-patch will measure 4 ½” square. Make 4 units.
- Mark a diagonal line across the back of the 1 ½” White squares. Place 3 White squares on three corners of each 4-patch. Sew on the line then trim out the bottom two layers. Press away from the center. Repeat for each unit
- Sew the 4-patch units together. This unit will measure 8 ½” square.
- Sew (4) HSTs together as illustrated on the outside side of block. Make 2 sets measuring 2 ½” X 8 ½”.
- Sew (6) HSTs together as illustrated on the top and bottom of block. Make 2 sets measuring 2 ½” X 12 ½”.
- Sew together the 8 ½” center and the HST sets to complete the Scrappy Clover Block.
Fat Quarter Exchange:
Bring Fat Quarters in the color/theme of the month. For each Fat Quarter you submit, you are given one chance of winning a group of Fat Quarters that have been submitted for that month. The more Fat Quarters you submit, the more chances you have of winning a group of Fat Quarters. … In case you had not noticed, the Fat Quarter color of the month will be a featured fabric color for the Block on the Month the following month. If you win, you will be ready to make lots of blocks for the next month.
Fat Quarter Exchange:
For the month of April: Yellows, Reds, Blues
(Note: Please remember Fat Quarters are 18” X 22”)
Bring Fat Quarters in the color/theme of the month. For each Fat Quarter you submit, you are given one chance of winning a group of Fat Quarters that have been submitted for that month. The more Fat Quarters you submit, the more chances you have of winning a group of Fat Quarters. … In case you had not noticed, the Fat Quarter color of the month will be a featured fabric color for the Block on the Month the following month. If you win, you will be ready to make lots of blocks for the next month.
Fat Quarter Exchange:
For the month of February: Brights (Solids, Prints, Any Fabric that is Bright Colors)
Bring Fat Quarters in the color/theme of the month. For each Fat Quarter you submit, you are given one chance of winning a group of Fat Quarters that have been submitted for that month. The more Fat Quarters you submit, the more chances you have of winning a group of Fat Quarters. … In case you had not noticed, the Fat Quarter color of the month will be a featured fabric color for the Block on the Month the following month. If you win, you will be ready to make lots of blocks for the next month.
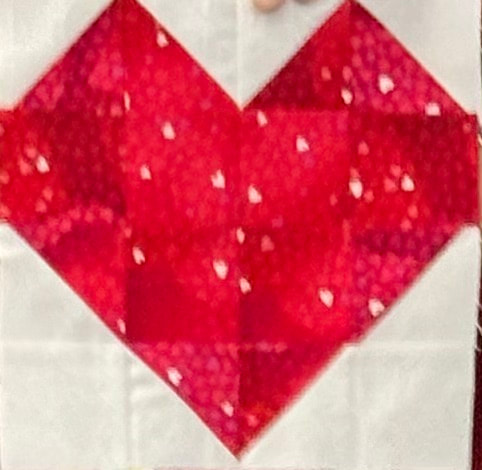
Block of the Month: January
Colors: (A) Background - White
(B) Heart – Scrappy Reds
Cutting for (1) 8 ½” X 8 ½” unfinished block
(A) Background
(4) 3” White Squares
(2) 2 ½” White Squares
(B) Heart
(4) 3” Red Squares
(6) 2 ½” Red Squares
1. Mark a diagonal line across the back of a 3” White square. Place the background square RST with a 3” Red square. Sew ¼”
away from each side of the marked line. Cut the unit apart on the drawn line and press open. Repeat for a total of 8 HST.
2. Trim each HST to 2 ½” X 2 ½”.
3. Lay out all of the HST’s along with all of the 2 ½” squares as shown. Sew the pieces together in horizontal rows,
press open.
4. Sew the rows together, press open to complete the Scrappy Heart Block.
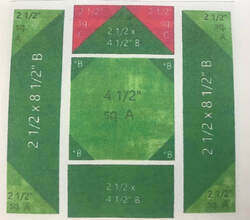
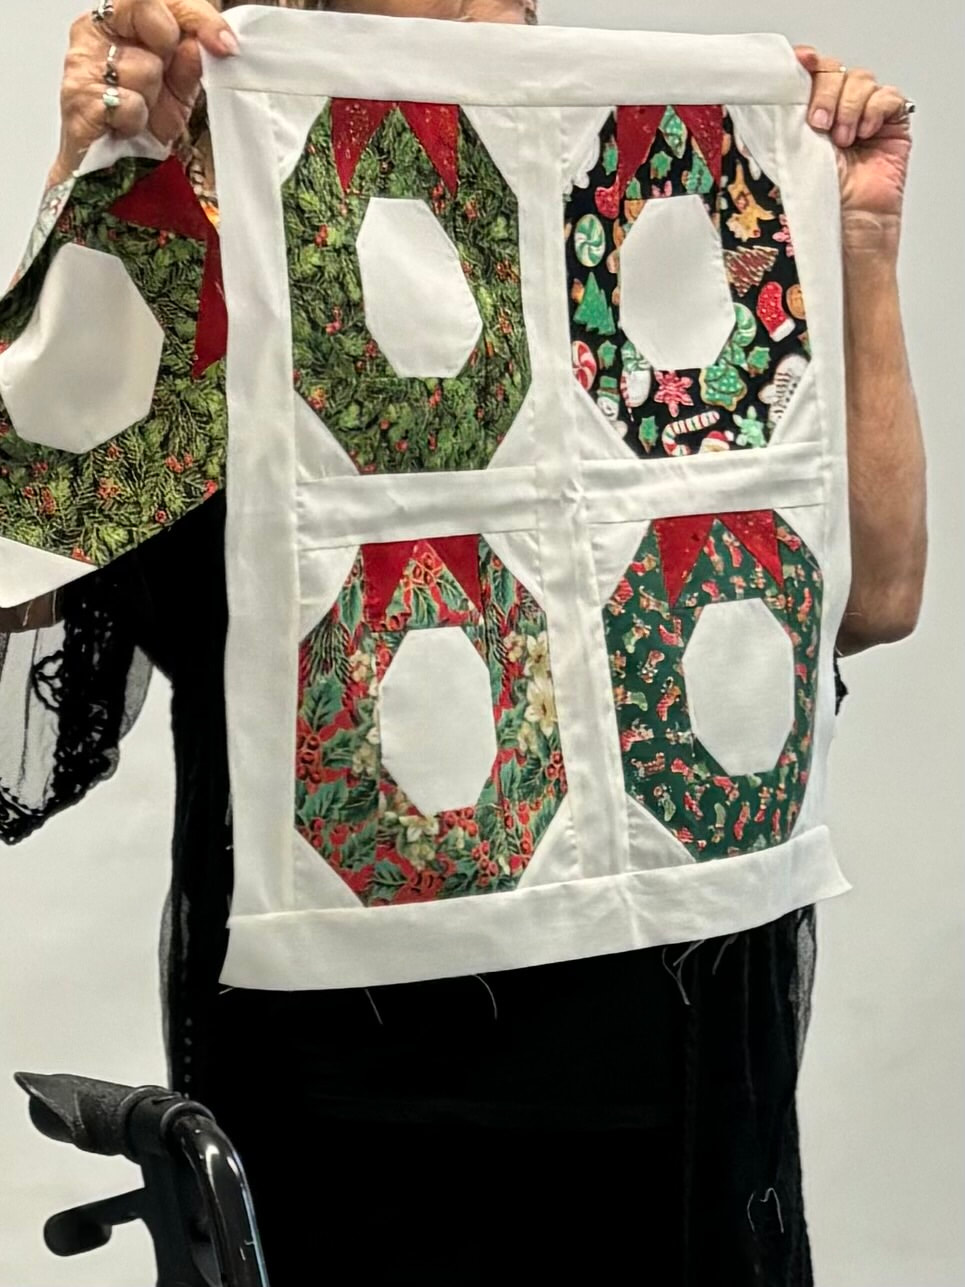
Block of the Month: Christmas Wreath
Colors: (A) Background - White (B) Wreath - Christmas Prints (C) Bow – Contrasting Solids Cutting for (1) 8 ½” unfinished block (A) Background (4) 2 ½” Square (1) 4 ½” Square (B) Wreath (4) 1 ½” Square (2) 2 ½” X 4 ½” Rectangle (2) 2 ½” X 8 ½” Rectangle (C) Bow (2) 2 ½” Square 1. Using (2) 2 ½” squares of Bow Fabric ‘C’ and (1) 2 ½” X 4 ½” Rectangle of Wreath Fabric ‘B’ make a flying geese unit.(Sew first corner and clip/ flip before stitching second corner). 2. Using (2) 2 ½” squares of Background Fabric ‘A’ and (1) 2 ½” X 8 ½” Rectangle of Wreath Fabric ‘B’ make a flying geese unit. Repeat for a total of two of these units. 3. Using (4) 1 ½” Squares of Wreath Fabric ‘B’ and (1) 4 ½” Square of Background Fabric ‘A’ make a snowball block. 4. Assemble as shown using scant ¼” seams. |
|
|
Current (and past month’s) blocks are listed below:
2023 Block of the Month Patterns |
|
| bright_lanterns.docx |
| cbq_bom_olivias_chickens_.pdf |
| cbq_bom_two_of_hearts_jan_2023.pdf |
2022 Block of the Month Patterns
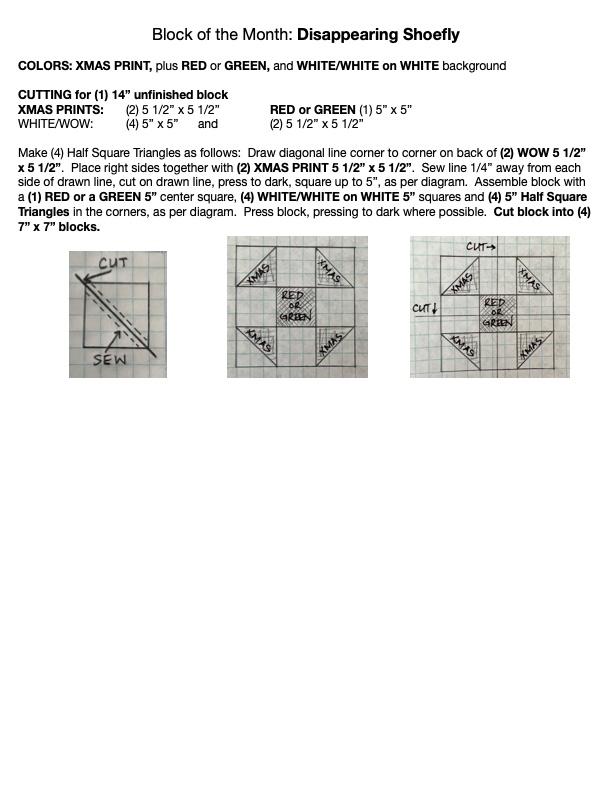
| disappearing_shoofly_image_10-1-22_at_10.26_am.jpg |
| cbq_bom_hot_air_balloon_aug_2022.pdf |
| cbq_bom_puss_in_the_corner_july_2022.pdf |
| half_log_cabin.docx |
| cbq_bom_think_positive_block_may_2022.pdf |
| cbq_bom_marys_block_april_2022.pdf |
2021 Block of the Month Patterns
| nov_2021_delectablemtn_block_of_month.docx |
| oct_2021_birches_block_of_month.docx |
| trick_and_treat_blockofthemonth.docx |
| scrapbuster_blockofthemonth.docx |
| popsicle_blockofthemonth.docx |
| party_present_block.docx |
| camping_trees_block_of_the_month.docx |
| museum_block.pdf |
| kite_blockofthemonth.docx |
| farm_block.pdf |
| ornament_block.pdf |
| spool_block.pdf |
| clover_block.pdf |
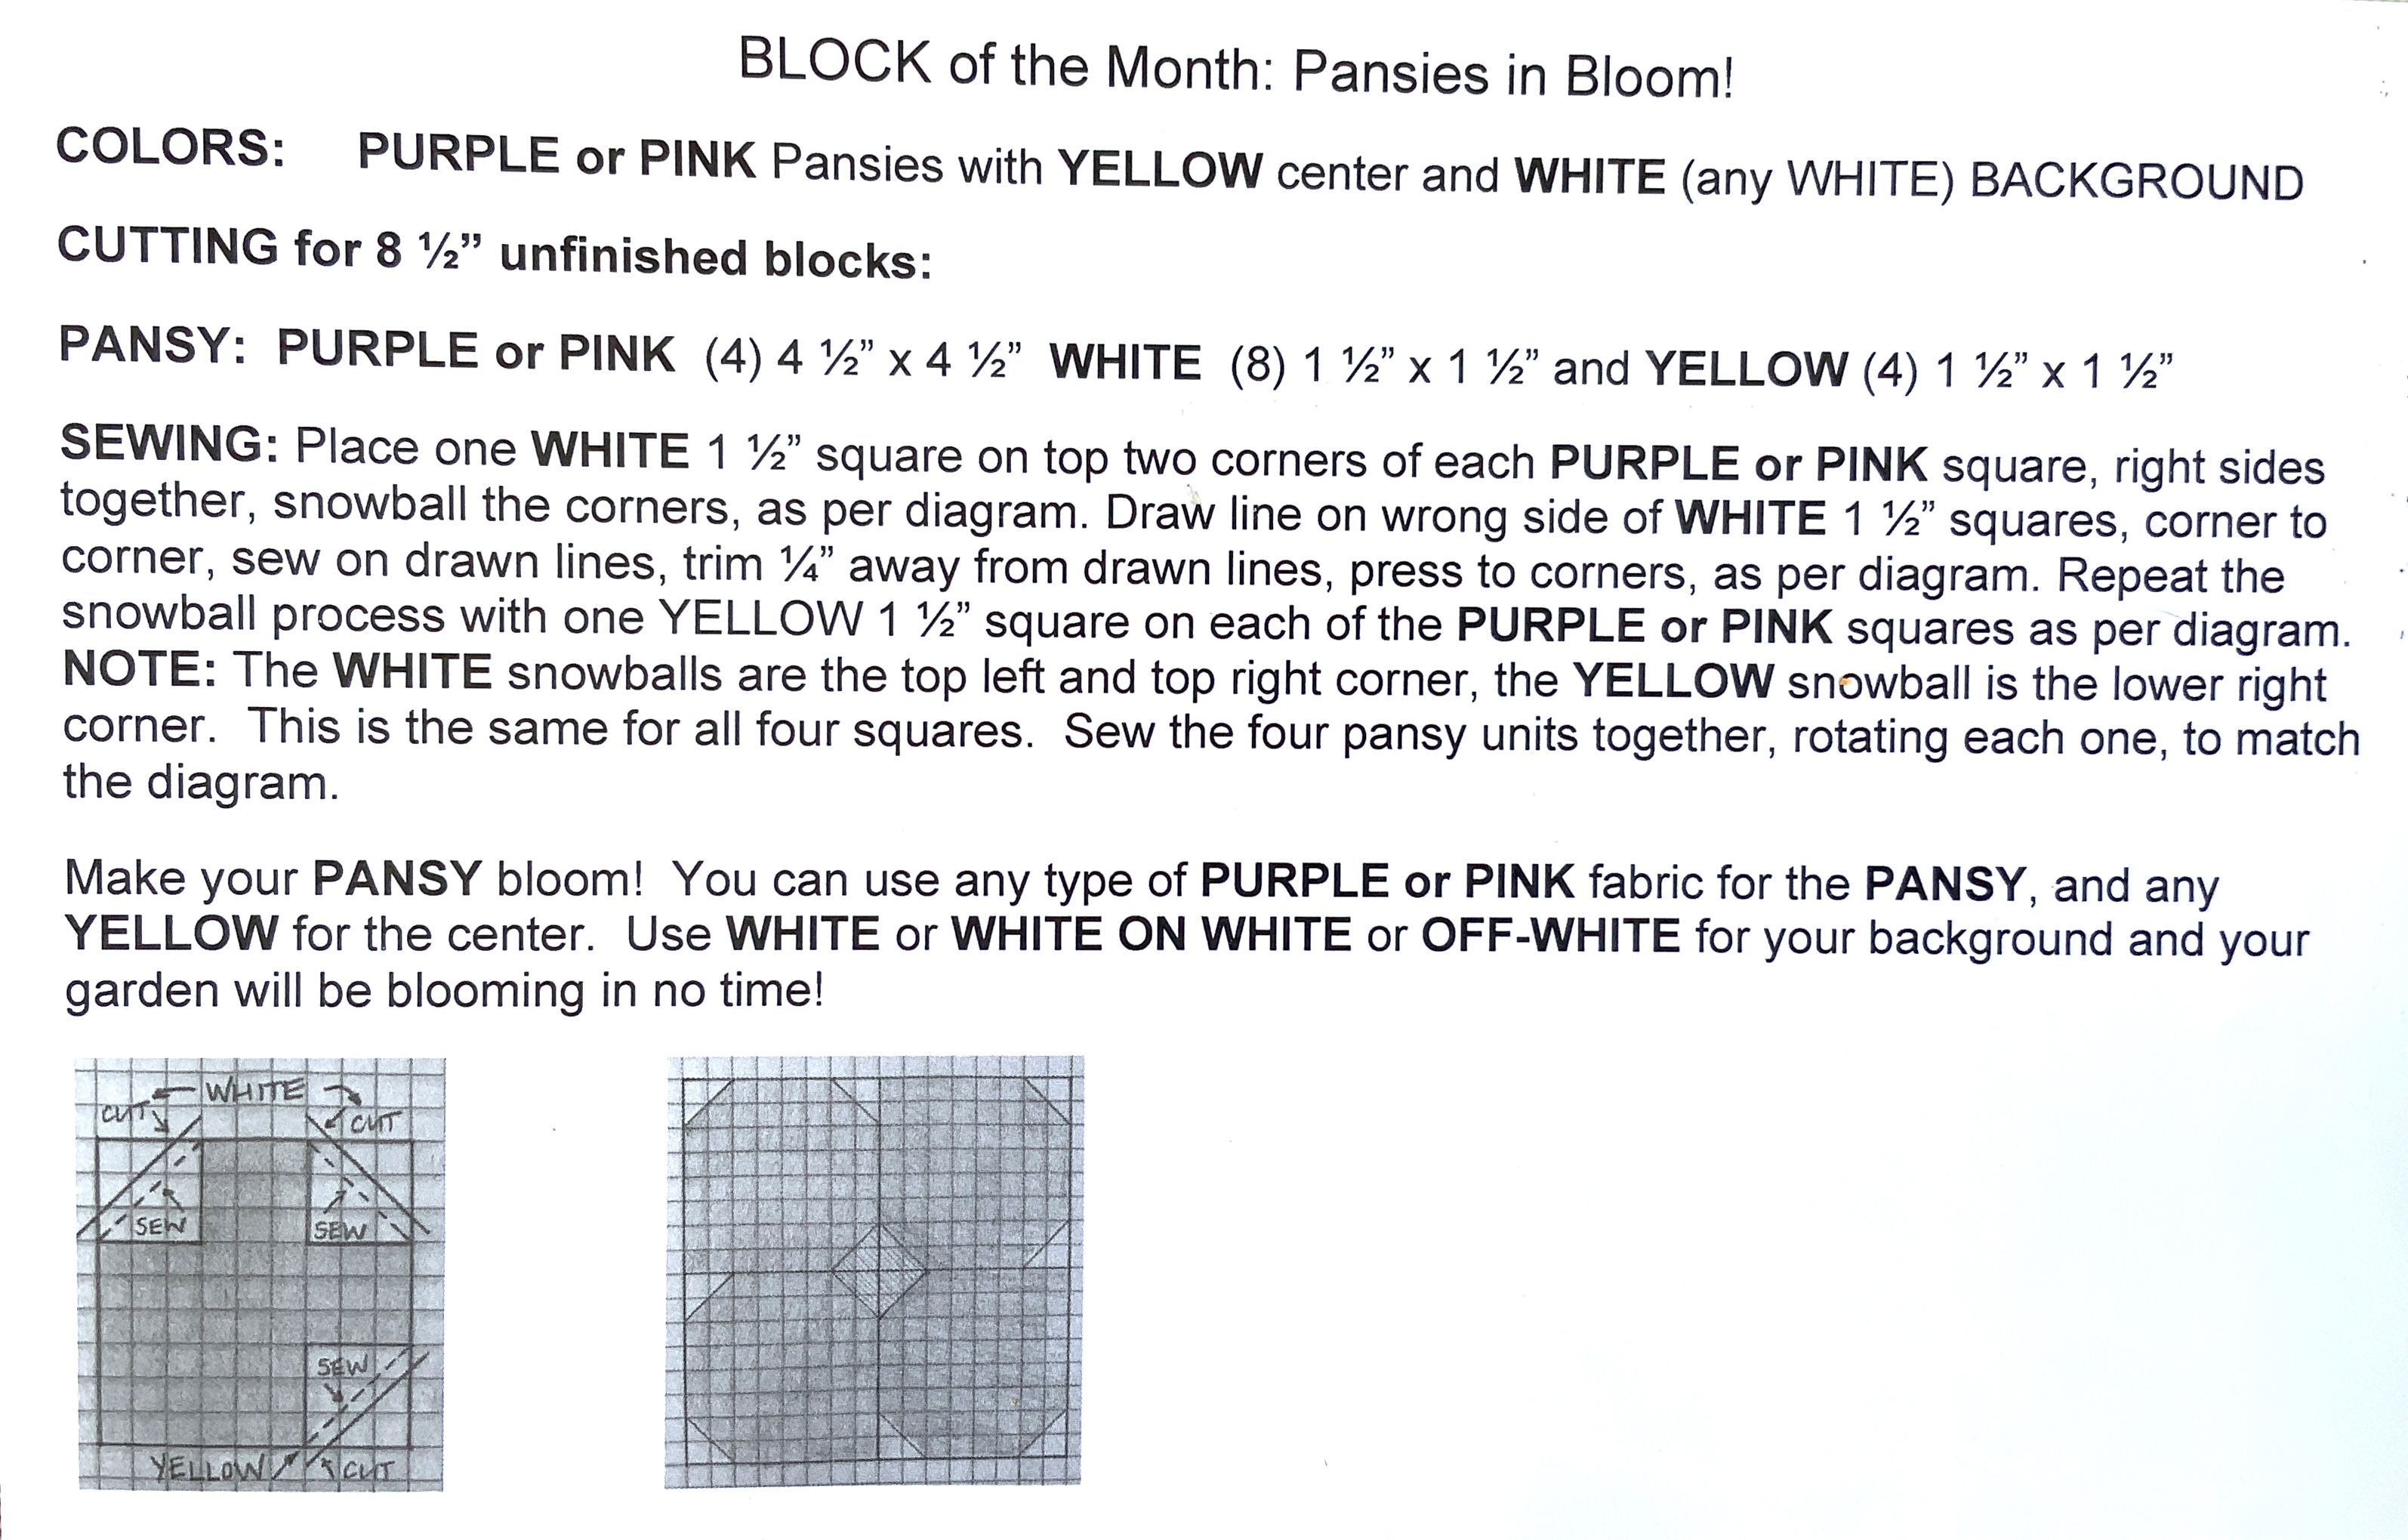
| pansy_block.jpg |
Current Block of the Month: Bright Lanterns
(distributed at July 2, 2023 meeting)
(distributed at July 2, 2023 meeting)
|
(Click on photo to expand)
|
For more information on Block of the Month, please see Toni Banks or Tessa Phillipi (contact info in Member Directory)